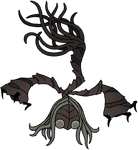
Silksong Tools & Guides
Silksong

Silksong Bosses – Complete Guide

Master every Hollow Knight: Silksong boss with our comprehensive guide. Find boss locations, strategies, difficulty ratings, and recommended tools for all 47+ bosses across Acts 1-3.

Updated after every patchSpoiler-safe view

Filter Bosses

All Acts
All Difficulties
All Types
Hide Spoilers
Clear Filters

Boss Statistics

Track your progress through Pharloom with our comprehensive boss database

47+
Total Bosses
10
Main Story
37
Optional
5
Secret

All Bosses

Click on any boss to view detailed strategies, move patterns, and recommended tools

Showing 27 of 44 bosses

Non-Spoiler VersionSwitch to Show Spoilers in filters above
Moss Mother boss from Act 1 in Shellwood - Difficulty B - Optional boss in Hollow Knight: Silksong

Moss Mother

Act 1Shellwood

B

The first boss! She's not too hard, and thankfully there's a Bench right under her.

Strategy:

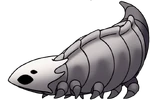
Monitor her floating movements and be careful when she does a dive bomb. She'll also slam into the ceiling to dislodge rock chunks or summon Moss Grubs.

Rewards:

Access to next area

Recommended Tools:

straight_pintacks
Craggler boss from Act 1 in Sinner's Road - Difficulty C - Optional boss in Hollow Knight: Silksong

Craggler

Act 1Sinner's Road

C

A rocky creature that guards the early paths through Sinner's Road.

Strategy:

Stay mobile and attack from behind. Watch for its ground slam attacks.

Rewards:

Basic materials

Recommended Tools:

tacksstraight_pin
Find Tools
Savage Beastfly boss from Act 1 in Far Fields - Difficulty B - Optional boss in Hollow Knight: Silksong

Savage Beastfly

Act 1Far Fields

B

Hits very hard on its own, but just wait until it summons reinforcements.

Strategy:

Savage Beastfly starts the fight with both horizontal and vertical charges across the screen. Jump and slash, and whenever it finishes a horizontal charge and hits a wall, get in close to commit to three swift strikes.

Rewards:

Beast Crest

Recommended Tools:

straight_pinmultibinder
Trobbio boss from Act 1 in Marrow Outskirts - Difficulty B - Optional boss in Hollow Knight: Silksong

Trobbio

Act 1Marrow Outskirts

B

A wandering creature found in the outskirts of the Marrow.

Strategy:

Keep your distance and use ranged attacks. Watch for its charging attacks.

Rewards:

Basic materials

Recommended Tools:

straight_pincompass
Find Tools
Disgraced Chef Lugoli boss from Act 1 in Shellwood - Difficulty B - Optional boss in Hollow Knight: Silksong

Disgraced Chef Lugoli

Act 1Shellwood

B

A former chef who has fallen from grace, now lurking in the depths of Shellwood.

Strategy:

Avoid his cooking pot attacks and strike when he's vulnerable.

Rewards:

Cooking materials

Recommended Tools:

longclawneedle_phial
Find Tools
Great Conchflies boss from Act 2 in Far Fields - Difficulty B - Optional boss in Hollow Knight: Silksong

Great Conchflies

Act 2Far Fields

B

Large flying creatures that patrol the Far Fields.

Strategy:

Use aerial attacks and stay mobile. Watch for their diving attacks.

Rewards:

Conch materials

Recommended Tools:

conchcutterquick_sling
Find Tools
Sister Splinter boss from Act 2 in Shellwood - Difficulty B - Optional boss in Hollow Knight: Silksong

Sister Splinter

Act 2Shellwood

B

Not terribly hard on her own, but the minions that she summons can be tricky.

Strategy:

Defeat her by slashing upwards at her head, and be careful when her claws turn white, as that's the indication of an upcoming attack.

Rewards:

Access to the Weaver statue with Cling Grip

Recommended Tools:

longclawneedle_phial
Find Tools
Lace boss from Act 2 in Greymoor - Difficulty S - Required boss in Hollow Knight: Silksong

Lace

Act 2Greymoor

SRequired

A fun recurring boss throughout Hollow Knight: Silksong and reminiscent of what Hornet was in the original game.

Strategy:

You can avoid the majority of her flurries, dashes, and slash strikes by jump-dashing over her to attack from the other side, or Pogo-ing off of her head.

Rewards:

Access to next area

Recommended Tools:

curveclawreserve_bind
Find Tools
Phantom boss from Act 2 in Greymoor - Difficulty B - Optional boss in Hollow Knight: Silksong

Phantom

Act 2Greymoor

B

A ghostly apparition that haunts the depths of Greymoor.

Strategy:

Use tools that can affect ethereal beings. Watch for its phase-shifting attacks.

Rewards:

Phantom essence

Recommended Tools:

pimpilloinjector_band
Find Tools
Bell Beast boss from Act 2 in Bellhart - Difficulty A - Optional boss in Hollow Knight: Silksong

Bell Beast

Act 2Bellhart

A

The fast travel steed of Silksong. You'll need to bash some sense into it with your Nail before you can ride it though.

Strategy:

The Bell Beast alternates between a few attacks, starting with a forwards dash, which is easy to jump over or Pogo off of its back.

Rewards:

Silk HeartTransport across Pharloom via Bellways

Recommended Tools:

throwing_ringwarding_bell
Find Tools
Skull Tyrant boss from Act 2 in Greymoor - Difficulty A - Optional boss in Hollow Knight: Silksong

Skull Tyrant

Act 2Greymoor

A

Big and intimidating it may be, but the Skull Tyrant's tactics are not complicated.

Strategy:

The Skull Tyrant has three main moves - if it starts running, it's about to charge, so jump over it and get in a Pogo slash or two.

Rewards:

Crown Fragment

Recommended Tools:

curvesicklereserve_bind
Find Tools
Moorwing boss from Act 2 in Greymoor - Difficulty B - Optional boss in Hollow Knight: Silksong

Moorwing

Act 2Greymoor

B

Can be a very devastating boss, especially since many Silksong players run into this big fly early in their travels.

Strategy:

Moorwing's attacks include downwards slashes with its legs, dive charges across the floor, and firing off claws that roll along the ground.

Rewards:

Access to next area

Recommended Tools:

throwing_ringreserve_bind
Find Tools
Cogwork Dancers boss from Act 2 in Spireworks - Difficulty A - Optional boss in Hollow Knight: Silksong

Cogwork Dancers

Act 2Spireworks

A

Mechanical dancers that perform a deadly ballet in the Spireworks.

Strategy:

Watch their synchronized movements and strike during their pauses.

Rewards:

Cogwork materials

Recommended Tools:

cogflyspool_extender
Find Tools
Signis and Gron boss from Act 2 in Bellhart - Difficulty A - Optional boss in Hollow Knight: Silksong

Signis and Gron

Act 2Bellhart

A

A duo boss fight featuring two complementary fighters.

Strategy:

Focus on one at a time. Watch for their coordinated attacks.

Rewards:

Duo materials

Recommended Tools:

throwing_ringwarding_bell
Find Tools
Groal the Great boss from Act 2 in Far Fields - Difficulty A - Optional boss in Hollow Knight: Silksong

Groal the Great

Act 2Far Fields

A

A massive creature that dominates the Far Fields.

Strategy:

Use hit-and-run tactics. Avoid its area attacks and focus on weak points.

Rewards:

Great materials

Recommended Tools:

curvesicklereserve_bind
Find Tools
Carmelita boss from Act 2 in Shellwood - Difficulty B - Optional boss in Hollow Knight: Silksong

Carmelita

Act 2Shellwood

B

A mysterious figure that guards the deeper parts of Shellwood.

Strategy:

Stay mobile and watch for her teleportation attacks.

Rewards:

Mystery materials

Recommended Tools:

longclawreserve_bind
Find Tools
First Sinner boss from Act 2 in Verdant Hall - Difficulty A - Optional boss in Hollow Knight: Silksong

First Sinner

Act 2Verdant Hall

A

The first of the sinners, bound in the Verdant Hall.

Strategy:

Use tools that can break through its defenses. Watch for its area attacks.

Rewards:

Sinner materials

Recommended Tools:

reserve_bindinjector_band
Find Tools
Raging Conchfly boss from Act 2 in Far Fields - Difficulty B - Optional boss in Hollow Knight: Silksong

Raging Conchfly

Act 2Far Fields

B

An enraged version of the conchfly, more dangerous than its kin.

Strategy:

Stay mobile and use ranged attacks. Watch for its enraged state.

Rewards:

Raging materials

Recommended Tools:

conchcutterquick_sling
Find Tools
Bell Eater boss from Act 2 in Bellhart - Difficulty B - Optional boss in Hollow Knight: Silksong

Bell Eater

Act 2Bellhart

B

A creature that feeds on the bells of Bellhart.

Strategy:

Use bell-based tools to confuse it. Watch for its feeding attacks.

Rewards:

Bell materials

Recommended Tools:

throwing_ringwarding_bell
Find Tools
Tormented Trobbio boss from Act 2 in Greymoor - Difficulty A - Optional boss in Hollow Knight: Silksong

Tormented Trobbio

Act 2Greymoor

A

A tormented version of Trobbio, driven mad by its suffering.

Strategy:

Use tools that can calm it down. Watch for its berserker attacks.

Rewards:

Tormented materials

Recommended Tools:

curveclawreserve_bind
Find Tools
Crust King Khann boss from Act 2 in Far Fields - Difficulty A - Optional boss in Hollow Knight: Silksong

Crust King Khann

Act 2Far Fields

A

The king of the crustaceans, ruling over the Far Fields.

Strategy:

Attack from the sides and avoid its frontal attacks. Watch for its shell defense.

Rewards:

Crust materials

Recommended Tools:

curvesicklelongclaw
Find Tools
Clover Dancers boss from Act 2 in Verdant Hall - Difficulty B - Optional boss in Hollow Knight: Silksong

Clover Dancers

Act 2Verdant Hall

B

Graceful dancers that perform in the Verdant Hall.

Strategy:

Watch their dance patterns and strike during their pauses.

Rewards:

Dance materials

Recommended Tools:

needle_phialmagnetite_brooch
Find Tools
Lost Garmond boss from Act 2 in Far Fields - Difficulty B - Optional boss in Hollow Knight: Silksong

Lost Garmond

Act 2Far Fields

B

A lost version of Garmond, wandering the Far Fields alone.

Strategy:

Use tools that can guide it. Watch for its confusion attacks.

Rewards:

Lost materials

Recommended Tools:

dead_bug's_pursecompass
Find Tools
Gurr the Outcast boss from Act 1 in Shellwood - Difficulty B - Optional boss in Hollow Knight: Silksong

Gurr the Outcast

Act 1Shellwood

B

An outcast creature that has made Shellwood its home.

Strategy:

Use hit-and-run tactics. Avoid its area attacks.

Rewards:

Outcast materials

Recommended Tools:

straight_pinreserve_bind
Find Tools
Crawfather boss from Act 1 in The Marrow - Difficulty B - Optional boss in Hollow Knight: Silksong

Crawfather

Act 1The Marrow

B

A massive crawling creature that guards the depths of the Marrow.

Strategy:

Stay above ground level and attack from above. Watch for its burrowing attacks.

Rewards:

Marrow materials

Recommended Tools:

tacksstraight_pin
Find Tools
Shakra boss from Act 2 in Bellhart - Difficulty B - Optional boss in Hollow Knight: Silksong

Shakra

Act 2Bellhart

B

A bell-based creature that resonates with the sounds of Bellhart.

Strategy:

Use sound-based attacks. Watch for its resonance attacks.

Rewards:

Sound materials

Recommended Tools:

throwing_ringcompass
Find Tools
Garmond and Zaza boss from Act 2 in Far Fields - Difficulty A - Optional boss in Hollow Knight: Silksong

Garmond and Zaza

Act 2Far Fields

A

A duo of creatures that work together in the Far Fields.

Strategy:

Focus on one at a time. Watch for their coordinated attacks.

Rewards:

Duo materials

Recommended Tools:

threefold_pinreserve_bind
Find Tools

More Bosses Coming Soon

We're continuously adding more boss guides and strategies. Stay tuned for updates!

More bosses coming soon

Stay tuned for more boss combat guides.

More bosses coming soon

Stay tuned for more boss combat guides.

More bosses coming soon

Stay tuned for more boss combat guides.

Boss Guide FAQ

Common questions about Silksong bosses and our guide system

How many bosses are in Silksong?

Silksong features 47+ bosses across three acts, including 10 main story bosses, 37 optional bosses, and 5 secret bosses.

Are there missable bosses?

Yes, some optional bosses can be missed if you don't complete certain quests or explore specific areas. Our guide highlights which bosses are required vs optional.

What tools are best for early bosses?

Early game bosses like Moss Mother and Bell Beast work well with basic tools like Straight Pin and Tacks. Each boss page shows recommended tools for optimal strategies.

How to practice without losing resources?

Use the Reserve Bind tool to heal safely, and practice boss patterns in safe areas before attempting the real fight. Our strategies focus on safe windows and counter opportunities.